
Installing a new concrete floor can be a difficult process, but it might be expensive to hire someone for the job. So, you may be wondering how to pour a concrete floor into a brand new garage on your own. With the appropriate preparation, this is definitely possible. But there are many factors and tools to consider. We have thoroughly researched how to pour a concrete floor in an existing garage to help you with the process.
Pouring a new concrete floor is a time sensitive and ambitious project, even for an existing garage. You should not pour concrete over old concrete. Only work in a prepared, fresh garage. It is best to hire professionals, but this can still be a DIY project. Ideally, you would also invite the help of at least one or two assistants for the complete process:
- Prepare concrete forms
- Select concrete
- Mix and pour concrete
- Tamp the aggregate
- Screed the concrete
- Apply float
- Cut edges
- Add joints
- Trowel or broom finish
Although pouring a new concrete floor can be highly challenging, especially for beginners, it can still be accomplished with enough time and effort. Keep reading for more detailed steps, and how to make sure the new concrete slab is stable enough for the garage.
Can a concrete slab be poured over an existing slab?
While it is possible to simply pour new concrete over an old slab, this is never ideal. The new layer will almost certainly be affected by the weaknesses of the existing concrete.
Any cracks that have breached the surface, or undetected cracks that are forming underneath, will make the new slab unstable. And the new slab of concrete will already be weakened because it must use less aggregate, which is primarily supportive gravel.
Also, the new slab will need to be poured with at least two inches of thickness. That can disrupt the desired height of a garage floor. As a result, your driveway and the door leading into the house will probably not line up. These issues will be costly and time-consuming to resolve.
As such, you would then have to remove the existing slab of concrete. This is a complex process of its own and may require heavy machinery. While there are some handheld tools that can break down concrete, this would take a lot of time and is potentially dangerous.
You can read the post How To Drill Into Concrete Floor [A Complete Guide] for more details.
Can you pour your own concrete slab for a garage?
Usually, professionals are hired to pour and finish a new concrete slab for a garage. This can require a special truck with chutes to distribute the concrete.
There would also be a full team to spread out and finish the slab properly since many of the steps are time-sensitive. If certain steps are not completed at the correct time, the job will be more difficult and less refined.
However, enough preparation and the right tools can allow you to pour your own concrete slab. For each step, there will be many unique tools to assemble, which are not used in everyday home improvement.
How to Pour a Concrete Floor
1. Prepare Concrete Forms
The concrete forms are boards that form your perimeter. These are typically made of plywood because it usually keeps its durability and shape when subjected to wet concrete.
You will need to measure the appropriate length of 2x4 plywood boards to fit your own garage dimensions. You should also use a level to ensure that the boards and subsequent concrete will be even.
It may be necessary to use a chalk line. After marking both ends of the garage, you can use a chalk line to create straight, visible lines of chalk powder all the way across the floor. You can review this YouTube video to understand how chalk lines work:
After placing the forms, they will need to be nailed together. You may also use a power drill to connect the boards. These forms will hold in the concrete when you pour it.
2. Select Concrete
You must select the correct concrete mix before preparing or pouring anything. Experts warn that your concrete should have an ideal psi level to withstand your unique weather conditions.
Also, it is best to use a ready mix concrete that is crack-resistant. This is the only way to avoid laying down wire mesh or rebar. Instead, the mix includes synthetic fibers that already reinforce the concrete enough.
Will concrete crack without rebar?
Reinforcing bar, also known as rebar, is used to support the weak tension of concrete. Because concrete is weak in tension, it is subject to cracks over time. Rebar can help keep cracks from spreading into large problems, and it also makes sure the concrete will remain level.
3. Mix and Pour Concrete
Traditionally, concrete is mixed with water in a pail or wheelbarrow using a shovel. But this is highly demanding work, so you should use a concrete mixing drill instead.

Click here to see this concrete mixer on Amazon.
This is a power drill, designed to mix concrete. It can help you prepare many bags of concrete mix in a large bucket, which is much less time-consuming than mixing by hand. You can review this YouTube video for more details on the concrete mixing drill:
Next, you will begin pouring the mixed concrete into the far back corner of the garage. Lay the mix into neat horizontal rows. You will need a square shovel to move the concrete around because it is heavy and dense.
4. Tamp the Aggregate

Click here to find this tamper on Amazon.
Sometimes, poured concrete may need to be tamped. This means pushing the aggregate inside the concrete mix towards the bottom. This improves stability because the aggregate would otherwise just sit on the surface.
However, tamping is only necessary for low slump concrete. The slump refers to the consistency of the concrete mix. A low slump is less of a liquid, and harder to work with.
Tamping a higher slump concrete mix will only weaken the aggregate. That’s because a high slump is more like liquid. This allows the supportive aggregate to sink to the bottom on its own, and doesn’t need to be pushed.
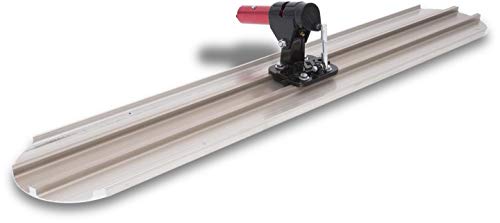
5. Screed the Concrete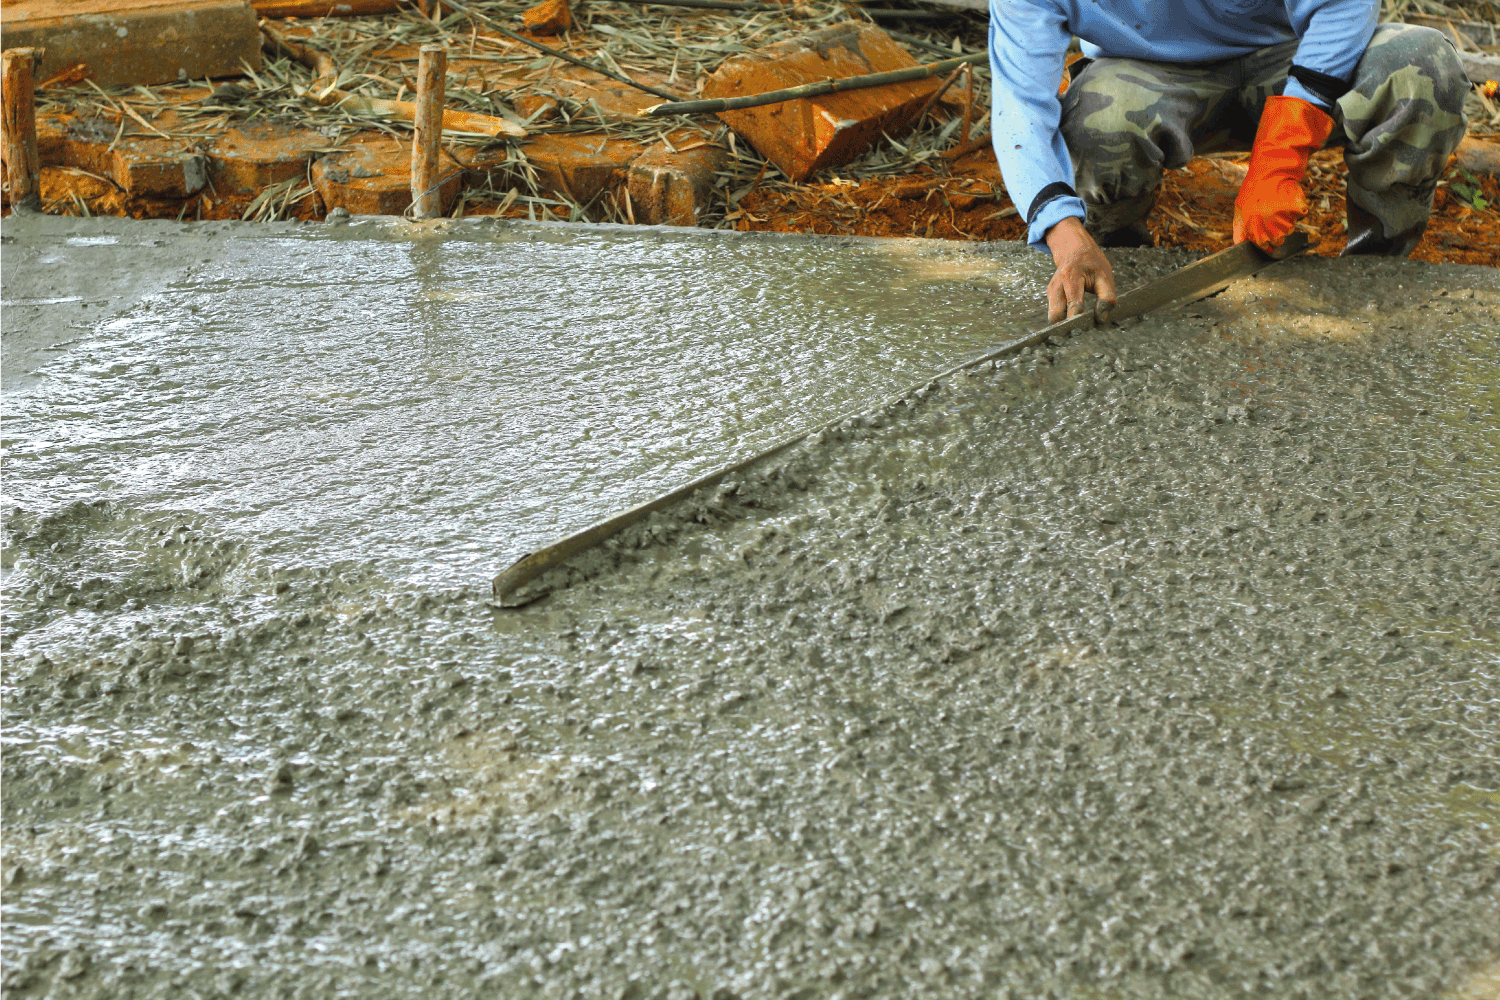
To screed poured concrete means smoothing out the surface and leveling it to the proper grade. You will need a level again, to make sure everything is even. However, some screed tools include a built-in level.

Click here to find this screed on Amazon.
Screeds are simply long boards equipped with handles that allow you to pull the board across the surface. The board is usually made of magnesium or wood.
6. Apply Float
Click here to find this bull float on Amazon.
Right after tamping and screeding the concrete, you will need to use a float tool. The most popular tools are commonly referred to as either darby or bull floats. These have long handles that will allow you to reach farther across the laid concrete.
Specialists explain that concrete floats level ridges and fill voids caused by screeding. It also prepares the surface for troweling, because screeding and floating the concrete does not close the surface.
Instead, moisture and water are allowed to bleed out. You can use a round-end float to work around difficult corners.
7. Cut Edges
Double check that the concrete is ready to be edged by pressing your fingers into the surface. When you can push your fingers about a quarter of an inch into the mix, it is just soft enough to create tidy edges.
If you wait too long, then the edges will become extremely difficult to carve. Usually, this will take at least half an hour after pouring the concrete.

Click here to find this concrete edger on Amazon.
Use an edging tool flat against the surface in order to carve clean edges along the perimeter of the slab. An edging tool is available with either long or short handles.
8. Add Joints
Concrete needs room to expand and contract during changes in temperature. You should plan ahead for ridges inside the concrete. These smooth, deliberate grooves will help control where cracks in the concrete will form, and can even make sure the cracks take a straightened shape.

Click here to see this concrete groover on Amazon.
You will need a concrete groover for this job. Experts have advised that the depth of your control joints should measure one-quarter of the slab’s thickness.
How thick does a concrete slab need to be for a garage?
The depth of your garage’s concrete slab is usually determined by your unique building code. However, the concrete should traditionally be four inches thick.
This allows the garage to withstand the pressure of routine vehicular traffic. If you have multiple large vehicles or heavy equipment, you may require a thicker concrete slab.
9. Trowel or Broom Finish
A steel trowel is used much like a hand float tool, but the unique material will help close the surface for high durability. However, troweling the concrete may also be more slippery.
It can also be a more difficult process since you will also require knee-boards to get close enough to apply more pressure. That proximity is why hand troweling creates such a clean and hard surface.
Instead, running a broom across the surface of the concrete is much less expensive and requires less work. Once this step is complete, you can read the post Should You Paint The Garage Floor? to decide if you want to paint the finished slab.
In Closing
Pouring a new concrete floor will likely be too difficult for beginners. It requires a great deal of research, many different tools, a lot of time, and plenty of manual labor.
It can also be quite costly if you don’t have the necessary equipment. However, adding a new concrete floor to your garage can still be a fun personal project, and you won’t have to rely on a hired company.