
There’s no doubt that crown molding is the perfect way to give almost any room a custom look. Despite its appeal, however, many people are reluctant to tackle this home improvement project because they aren’t sure how to cut the tricky angles involved. If you’d like the custom look but aren’t sure how to cut crown molding, this guide will give you all of the answers you need.
The most important part of cutting crown molding is getting the angles right. It would be best if you made a bevel cut at a 45-degree angle. Follow these steps to make sure your crown molding fits perfectly:
- Measure the wall you want to install the molding on, from inside corner to inside corner.
- Determine whether to cut the inside corner or the outside corner.
- Turn the molding upside down; hold it at the correct angle against the fence of a miter saw or the side of a miter box.
- Cut a 45-degree angle; position the molding's longest side on the bottom if you’re cutting an inside corner and on the top if you’re cutting an outside corner.
Cutting crown molding may sound complicated, but read on, and we’ll break down all of the steps for you and make it easy to understand.
![Detail of intricate corner crown molding. a detail of corner ceiling, How to Cut Crown Molding? [4 Steps]](https://uooz.com/wp-content/uploads/2020/10/How-to-Cut-Crown-Molding.jpg)
1. Measure the wall
The first, and perhaps most important, step to cutting crown molding is to measure accurately. It can be hard to get the precise measurements needed by jamming the tape measure into the corner and guessing.
It’s better to place the beginning of the tape measure in one corner and measure to the approximate middle of the wall, and make a mark. Then turn the tape measure around and measure from the other corner to the middle mark. Add those numbers together to get the total distance. This will give you precise measurements and a better fit in the end.
2. Determine whether to cut an inside corner or an outside corner
If you’re cutting an inside corner, your longest side will be the bottom of the crown molding. You will cut the 45-degree angle, starting at the bottom and going in towards the top. For outside corners, you will reverse this, and the longest edge will be the top. The 45-degree angle will start at the top and go in towards the bottom.
3. Position Molding Against the Miter Saw
Though it seems counter-intuitive, you will be cutting your crown molding upside down. The top will rest against the table, and the bottom will be propped up against the fence. You can either place some painter’s tape on the deck and draw a mark to align the top of your molding on the deck, or you can use a special jig made for this purpose.
4. Cut molding at a 45-degree angle
Now that your crown molding is properly lined up, make the 45-degree cut with a miter saw angled from left to right for an outside corner or right to left for an inside corner. It’s easier to visualize this if you hold up the crown molding at the angle you’ll install it before you line it up to make the cuts.
If you are using stained wood for your crown molding, you may want to use a coping saw to cut a bevel along with the molding profile. This step can be finicky and usually isn't necessary for painted molding.
What is the Easiest Way to Cut Crown Molding?

If you don’t mind spending extra money on a compound miter saw or have access to a friend’s, that is the easiest way to cut crown molding. A compound miter saw simplifies the process by making both the 45-degree cut and the bevel cut simultaneously. You don’t have to worry about propping up the crown molding.

Click here to see this miter saw on Amazon.
To cut crown molding with a compound miter saw, you’ll need to set your bevel and angle and lay your crown molding flat for the cut. Unlike with a miter saw or box, you will not be propping up the molding. The compound miter saw does the work for you. Another difference is that you will change which end of the molding is at the top, depending on the cut you want to make.
Guidelines for cutting corners with a compound miter saw
Outside corners
Use the right of the blade. Set the bevel left at 33.9. For the right side, set the miter right at 31.6 and place the top of the molding against the fence. For the left side, set the miter left at 31.6 and place the molding's bottom against the fence.
Inside corners
Use the left of the blade. Set the bevel left at 33.9. For the right side, set the miter left at 31.6 and place the bottom against the fence. For the left side, set the miter right at 31.6 and place the molding's top against the fence.
Can You Cut Crown Molding Flat?
You can cut crown molding flat if you have a compound miter saw. You will have to change whether you place the bottom or the top of the molding against the fence of the saw, depending on what angle you’re cutting, but it will be flat both ways. This helps eliminate some of the guesswork involved in holding the molding during the cut.
What are the Angles to Cut Crown Molding?
The angles used to cut crown molding are 33.9 for the bevel cut and 31.9 for the miter. These are the angles for crown molding placed on walls that meet at a 90-degree angle.
How Do You Measure Angles For Crown Molding?
If your walls have different angles, you will need to make custom cuts to each piece of molding based on your walls' angles. You can use a contour gauge duplicator to determine the exact cut.
What Tools Do You Need to Cut Crown Molding?
Basically, you’ll need a measuring tape, a mechanical pencil to mark your measurements, and a saw. Let's take a look at specific tools to make this DIY project easier.
Miter Box & Saw
Crown molding is expensive, but your equipment doesn’t have to be. If you are on a tight budget, you can buy an inexpensive saw and miter box.
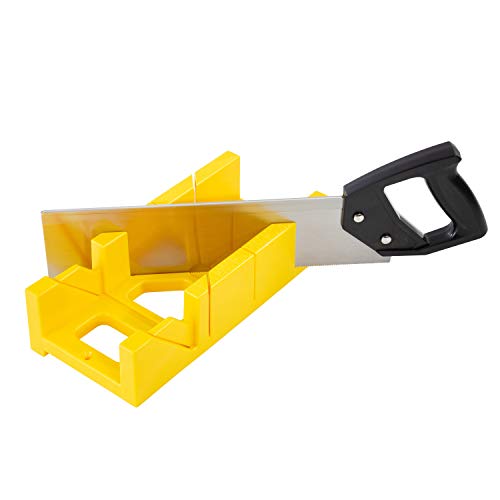
Click here to see this miter box on Amazon.
If you can afford to invest a little more for a power saw, you can get a miter saw and hold the crown molding as described above. This is a great option if you already have a miter saw. You won’t have to buy any additional tools.
Compound miter saw
If you plan to cut a lot of crown molding or just prefer the ease of use, you can get a compound miter saw. Though these are more expensive, they make the job easier and eliminate any guesswork.

Click here to check out this compound miter saw on Amazon.
Coping Saw
Additional tools that may be useful but aren’t necessary are painter’s tape and a coping saw.
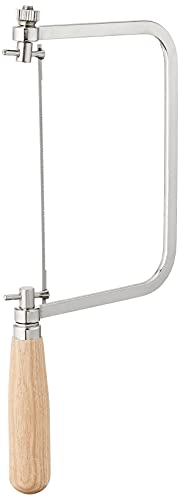
Click here to see this coping saw on Amazon.
Coping Saw
If your walls meet at angles other than 90-degrees, a contour gauge duplicator may be helpful.

Click here to see this contour gauge duplicator on Amazon.
In Conclusion
![Detail of intricate corner crown molding. a detail of corner ceiling, How to Cut Crown Molding? [4 Steps]](https://uooz.com/wp-content/uploads/2020/10/Detail-of-intricate-corner-crown-molding.-a-detail-of-corner-ceiling.jpg)
Cutting crown molding does take some time and thought, but it’s not difficult. With a little effort, you’ll be able to have a custom finish without the custom price. By following a few simple rules, your crown molding will look like it was done by a professional.
Before you start a DIY molding project, please also read: